

How to Check Mattress for Bed Bugs and What to Do Next

You've woken with an itchy mark, noticed a rusty smear on the sheet, or seen a dark speck near the mattress seam. The temptation is to pull the bed apart in a hurry, carry the mattress outside, and start spraying. Resist that reaction. A calm, contained inspection tells you far more, and it reduces the chance of moving anything into another room.
The mattress is the right place to begin because bed bugs stay close to the person they feed on, but a clean-looking mattress doesn't prove the bedroom is clear. The useful question isn't only whether you can spot a live insect. It's whether you can find a pattern of evidence and establish how far the inspection needs to extend.
Table of Contents
- What a Quick Bed Bug Check Can Tell You Before You Start
- Signs That Suggest Bed Bugs Are Present
- How to Inspect Your Mattress Thoroughly Without Missing Key Spots
- Checking Beyond the Mattress Around the Bed and Bedroom
- What to Do After Your Check and When to Escalate
- Simple Habits to Keep Your Mattress Protected Long Term
What a Quick Bed Bug Check Can Tell You Before You Start
A late-night discovery often looks insignificant. You might find one reddish mark on the sheet or a pin-sized dark dot along the piping. That doesn't automatically confirm bed bugs. It does, however, justify a structured check rather than a guess based on a single stain.
UK guidance consistently places the mattress first, particularly the seams, buttons, labels, and corner protectors, because bed bugs tend to cluster near sleeping areas. Advice for homes and residential settings also recommends checking the bed frame and nearby furniture, using a torch and looking for live insects, eggs, and dark faecal spots. You can follow the UK mattress and bed bug inspection guidance as a reference while you work.
Set up without spreading the problem
Choose a well-lit time when you can concentrate. Daylight helps, but a bright torch held at a low angle is often better for revealing raised marks, creases, and insects tucked under a fold.
Have these items ready:
- A bright torch: A narrow beam helps you inspect seams and joints rather than relying on room lighting.
- Disposable gloves: They're useful for handling suspect bedding and prevent you from smearing marks across the fabric.
- A pale sheet or large bag: Place removed bedding directly into it instead of carrying loose items through the home.
- A card or blunt-edged tool: Use it to open a gap in a joint, never to force fabric or damage the mattress.
- A phone camera: Photograph anything questionable before disturbing it, especially if you may need professional confirmation.
Don't drag the mattress through the house, shake the bedding, or place clothes on another bed. Keep the inspection local. A visual check can identify convincing signs, but it can't certify that no bugs are present, especially during an early infestation when evidence may be sparse.
Practical rule: Look for a collection of clues in hiding places, not one isolated mark on an exposed surface.
Know what reassurance means
Finding no evidence on the mattress is useful, but it only clears the areas you examined. Bed bugs can remain in the base, headboard, frame, skirting boards, sockets, or furniture beside the bed. If your concern comes from a recent stay elsewhere, a bite pattern, or a report from another room, continue the inspection beyond the mattress.
The aim is to replace panic with a decision. No signs may justify careful monitoring. Trace evidence calls for containment and closer attention. Live bugs, eggs, or repeated spotting should move the matter towards professional advice rather than repeated casual glances.
Signs That Suggest Bed Bugs Are Present
Before you touch the mattress, learn the difference between ordinary debris and evidence worth acting on. Bed bugs leave several types of trace, and they don't all appear together. The strongest inspection combines what you see with where you see it.
Start with marks and spotting
Dark faecal spots often provide better evidence than a live insect. UK guidance describes bed bug spotting as small reddish-brown marks, around 1 mm wide, which may appear along seams, piping, the bed base, or nearby furniture. The source for this measurement is UK residential bed bug guidance.
Look for small dots that are:
- Grouped rather than random: A cluster along a seam is more meaningful than a lone mark in the centre of the mattress.
- Dark brown or reddish: Fresh blood marks can look brighter, while older faecal spotting tends to appear darker.
- Embedded in a crease: Bed bugs favour protected edges, so evidence beside piping or under a label deserves attention.
- Slightly smeared when damp: A suspect spot may spread when touched with a barely damp cotton bud, although you shouldn't rub unknown marks aggressively.
Rust-coloured smears on sheets or the mattress can result from crushed insects. They can also come from ordinary bleeding, cosmetics, food, or fabric transfer, so colour alone isn't conclusive. Location and repetition matter more than appearance in isolation.
Recognise insects, eggs, and shed skins
Live bed bugs are flat, oval, and reddish-brown. They're often difficult to see because they retreat into seams and joints when disturbed. A pale, translucent shell shaped like a small insect may be a shed skin, while tiny pearly eggs can lodge in stitching and protected gaps.
Don't confuse lint, salt-like residue, or mattress foam crumbs with eggs. Eggs are attached to a surface and tend to occur in a protected location. Shed skins usually retain a recognisable insect outline, unlike loose dust.
The most useful evidence is often indirect. A clean-looking top surface can coexist with spotting, skins, or eggs in the seam.
Check the places where fabric changes direction or creates a pocket. Pay particular attention to piping, tufting, button recesses, labels, handles, corner guards, and the join between the mattress and its base. These locations take longer to inspect than the open sleeping surface, but they're where a quick glance most often fails.
If you're unsure about a mark, photograph it with a scale such as a ruler or coin placed beside it, without touching the suspected evidence. Keep the photograph and note its location. A clear record helps you compare the area later and gives a pest professional something more useful than a description such as “a tiny black mark”.
For a broader perspective on why marks on bedding can have many causes, this guide to common mattress stains and what they mean can help you avoid treating every discolouration as an infestation.
How to Inspect Your Mattress Thoroughly Without Missing Key Spots
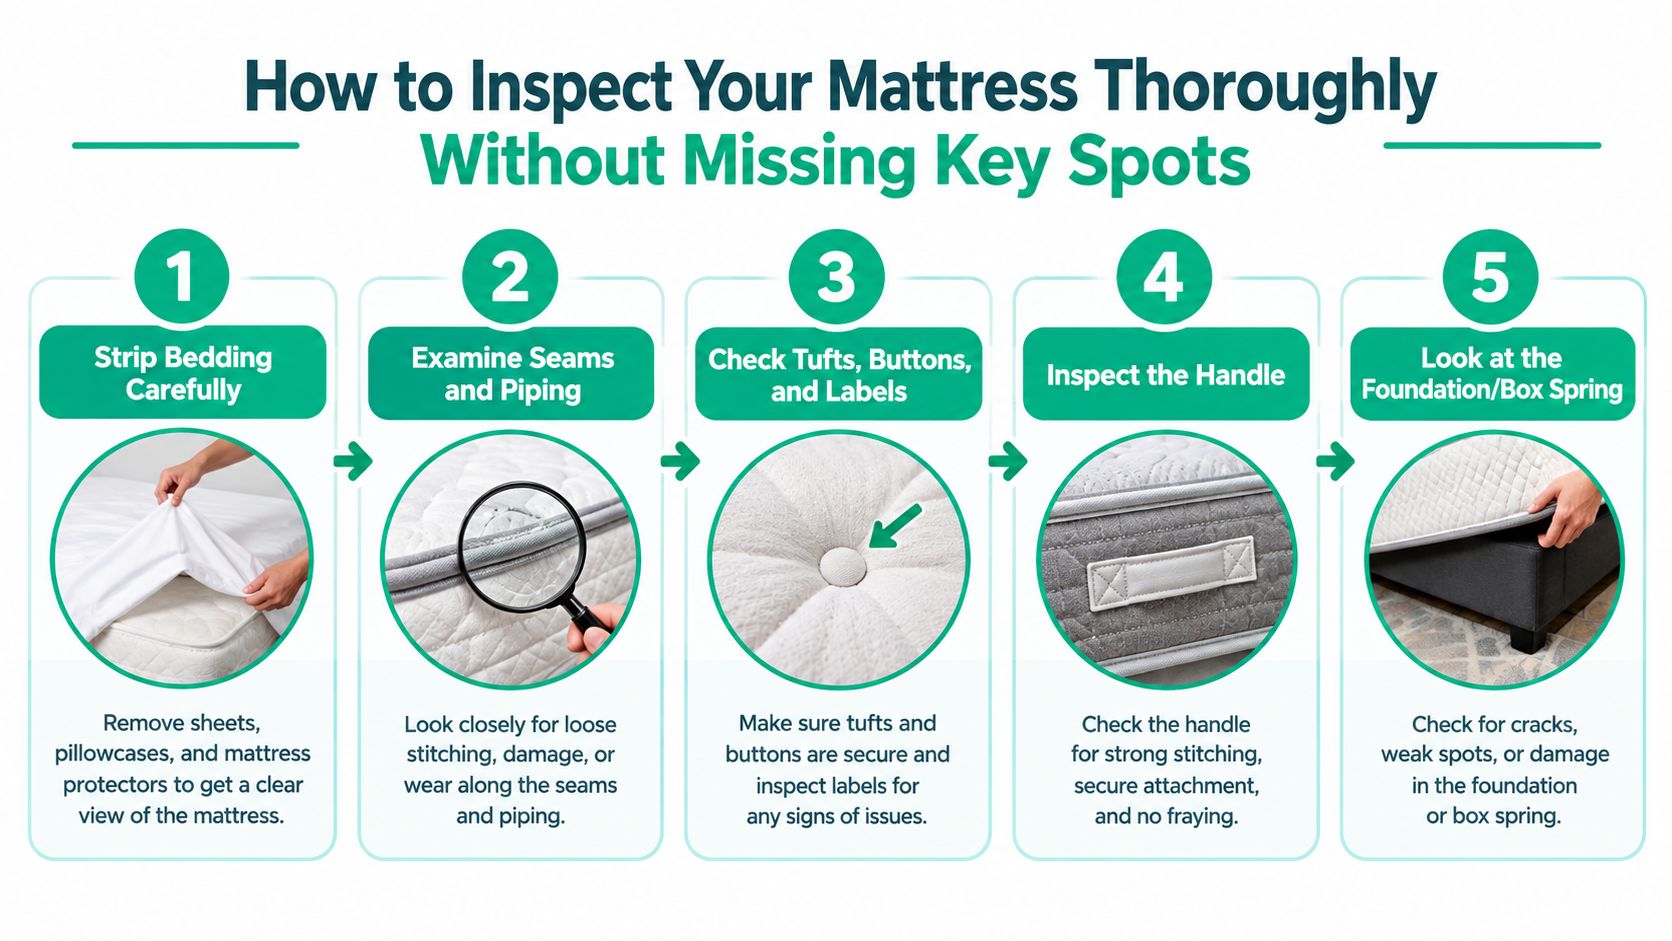
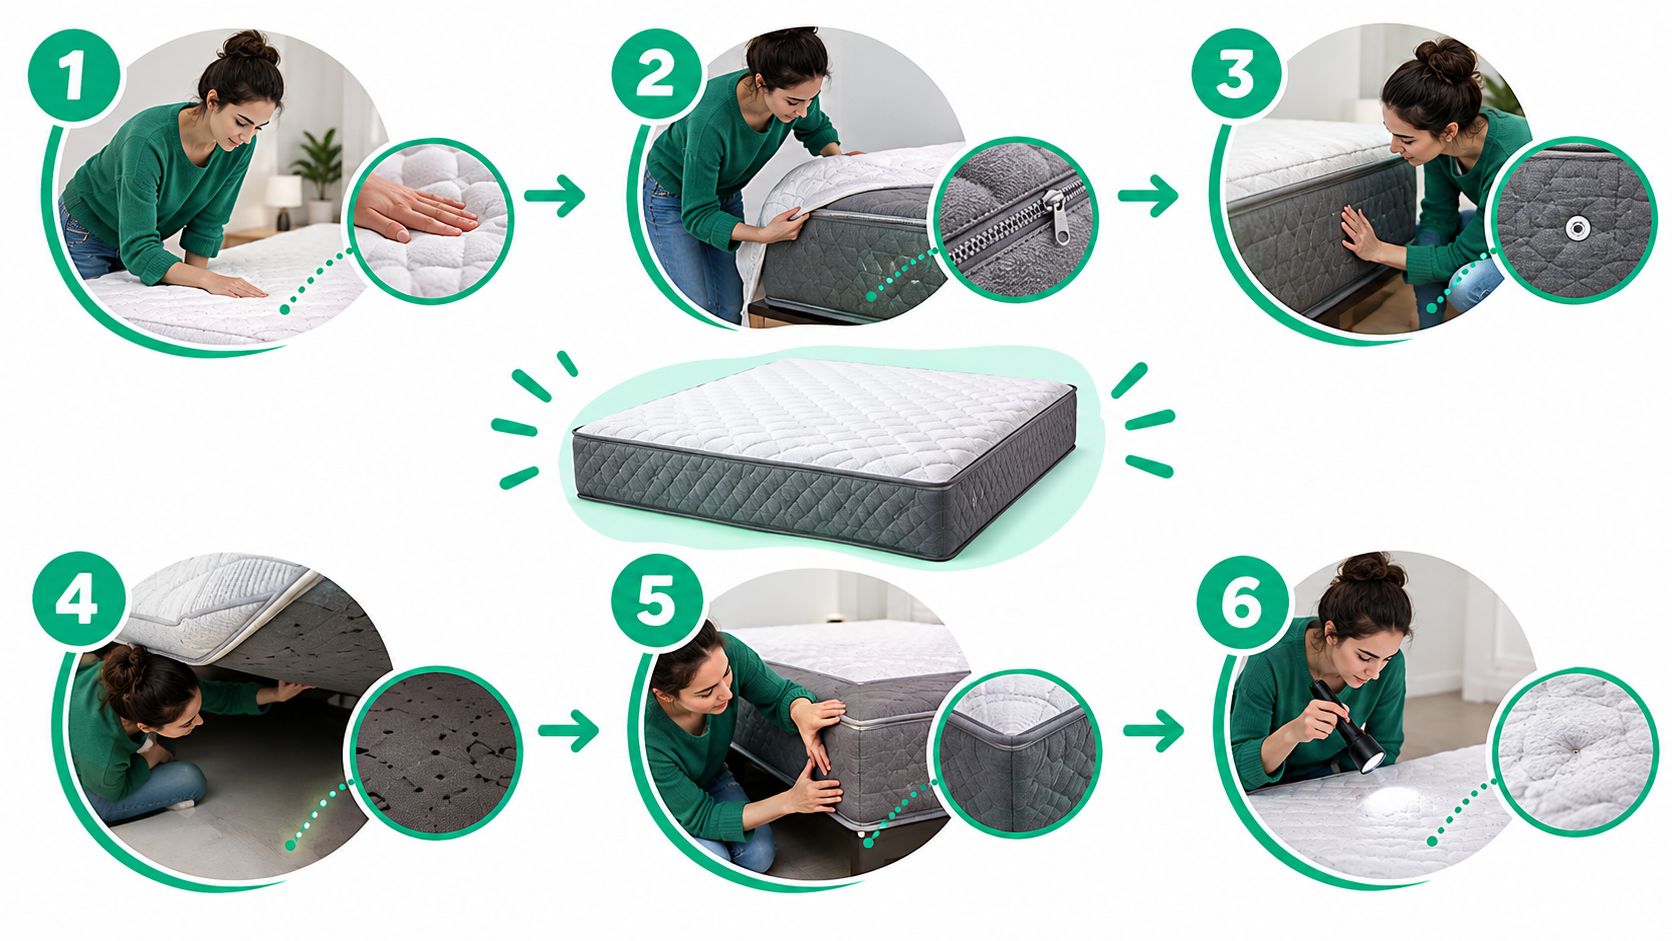
The best routine follows the mattress in a fixed order. A random inspection tends to focus on the most visible areas and skips the underside, labels, and corners where evidence may remain protected.
Strip the bed carefully
Remove pillows, blankets, and sheets one item at a time. Don't snap, flap, or toss them onto the floor. Fold each item inward, place it directly into a bag or suitable laundry container, and keep the container closed until it reaches the washing area.
Inspect the sheet and mattress protector as you remove them. Look at the corners, elastic, folds, and areas close to the sleeper's upper body. If you find an insect, don't crush it into the fabric. Preserve it if possible in a sealed container or take a close photograph.
Keep the mattress on its existing base. Moving it across the room can disturb insects and makes it harder to work out where evidence came from.
Work around the upper surface
Run the torch slowly over the mattress surface, then inspect the edge. Hold the light at a shallow angle so shadows reveal raised debris and irregularities. Pay attention to:
- Piping and seams: Follow the entire perimeter, opening the seam gently with your fingers.
- Buttons and tufts: Check each recess, including the fabric immediately beneath the button.
- Labels and stitched panels: Lift labels carefully and inspect their edges.
- Corner protectors: Examine the folds and stitching where the mattress turns.
- Handles: Look behind and around every handle, including the stitching that anchors it.
Don't rely on a quick sweep with your hand. Bed bugs and eggs can sit in the narrow fold beside the seam, where a fingertip won't reach and where overhead lighting creates a blind spot.
Inspect the sides and underside
With help, tilt the mattress just enough to expose one side and the lower edge. Avoid standing it upright or carrying it elsewhere. Examine the underside seam, corners, and the point where the mattress rests on the base. If the mattress has handles, inspect the fabric behind them rather than looking only at the handle itself.
A divan, sprung base, or other foundation needs its own inspection. Look along the upper lip, corners, joints, fabric folds, and any storage-panel gaps. A mattress can show little evidence while the base contains the more useful clues.
If the mattress already has an encasement, inspect the zip line, zip end, seams, and corners. Don't remove it casually. Where the cover design permits and you have a reason to investigate, unzip it carefully and inspect the inside of the encasement, because a UK NHS bed bug policy specifically instructs staff to check the interior for bugs or eggs.
Finish with a record
Photograph suspect evidence before cleaning or laundering. Write down the location, such as “right side seam near the foot” or “underside corner above the base”. This makes repeat checks consistent and helps distinguish a new finding from an old stain.
A rapid visual inspection can be useful during routine room turnover. UK hospitality guidance describes a trained housekeeper completing a roughly 30-second visual check of the bed and immediate surroundings, with passive monitoring as a supplement rather than a replacement. That speed works as a screening measure, not as a substitute for the slower examination described here.
Checking Beyond the Mattress Around the Bed and Bedroom
A mattress-only inspection answers a narrow question. It tells you whether visible evidence is present on the mattress and its immediate edges. It doesn't tell you whether activity has moved into the structure supporting the bed or the furniture close to it.
Start with the bed frame. Use the torch on slats, screw heads, corner joints, brackets, castors, and cracks in painted or wooden surfaces. If the frame has a headboard, inspect both the mattress-facing side and the rear joints, especially where panels meet.
Search the immediate perimeter
Move outward from the bed in a deliberate circle. You're looking for harbourage, not just open floor space.
- Bedside furniture: Check drawer runners, underside edges, rear panels, joints, and the area beneath the top surface.
- Skirting boards: Follow the wall behind the bed and inspect cracks, gaps, and corners.
- Sockets and cable routes: Look at the surrounding plate and wall gaps without removing electrical fittings.
- Curtains and wall fixtures: Examine hems, folds, brackets, and the rear of nearby fixtures.
- Clutter beside the bed: Check bags, books, boxes, and clothing piles that touch or sit close to the sleeping area.
A piece of stiff card can help open a frame joint slightly, but don't prise apart furniture or insert anything into an electrical socket. The goal is to illuminate gaps safely, not dismantle the room.
Judge the pattern, not one room feature
One dark mark on a skirting board may be old dirt. Several related signs around the mattress, frame, and bedside furniture form a different picture. The wider the pattern, the less useful it is to replace or clean one item and leave the room untreated.
Bed bugs can spread beyond the bed into skirting boards, sockets, and adjacent furniture. That's why a clean mattress can create false reassurance, particularly when an infestation is early or when the main harbourage is in the base or frame.
Inspection boundary: Check the mattress first, then the base, frame, headboard, and furniture close enough to support movement between hiding places.
Don't vacuum aggressively before photographing evidence, and don't spray unidentified products into sockets, seams, or fabric. Cleaning may remove the clue without resolving the source. If you find repeated signs in more than one location, keep the room undisturbed and prepare a clear record for a qualified pest professional or responsible landlord.
What to Do After Your Check and When to Escalate
Your next step depends on the evidence, not on how alarming the initial suspicion feels. A clean inspection and a confirmed live insect shouldn't receive the same response, but neither should be dismissed without considering the wider bedroom.
| Evidence level | Immediate actions | When to escalate |
|---|---|---|
| No signs found | Keep bedding contained during removal, repeat a careful check if concern remains, and monitor the mattress, base, and nearby furniture. | Escalate if new spotting, shed skins, eggs, or live insects appear, or if another room reports signs. |
| Light trace evidence | Photograph the marks, avoid moving the bed, launder suspected bedding, and consider a properly sealed bed bug encasement for containment and monitoring. | Seek advice if evidence repeats, appears in several locations, or can't be identified confidently. |
| Clear active signs | Preserve photographs or a specimen, keep people and pets away from unnecessary contact with the area, and avoid moving furniture or bedding between rooms. | Contact a qualified pest professional. Tenants should also notify the landlord or managing agent promptly. |
If you found nothing
Don't turn an unsuccessful search into endless nightly dismantling. Recheck the areas that were difficult to see, keep the bed area uncluttered, and pay attention to fresh evidence rather than bites alone. Skin reactions vary and aren't a reliable identification method by themselves.
If the concern followed travel or contact with an affected room, isolate potentially exposed laundry and inspect luggage away from bedrooms. Avoid placing suitcases on beds while you decide what to do.
If you found marks or trace evidence
Wash suspected bedding at a minimum of 60°C for ideally 90 minutes, then use a tumble-dryer cycle of at least 30 minutes, following the item's care instructions. These UK thresholds are set out in official bed bug cleaning guidance. Keep clean items sealed until the inspection and containment plan is clear.
A bed bug-proof encasement can seal the mattress and reduce available hiding places on the mattress itself. It doesn't treat the frame, base, floor, or surrounding furniture, and it must remain intact with the zip and seams closed. For a practical explanation of whether bed bug encasements work, focus on containment and monitoring rather than expecting a cover to replace treatment.
If you found clear signs
Don't dispose of the mattress first. An unprotected mattress can spread the problem through corridors, stairwells, vehicles, or other homes. Leave it in place unless a professional gives different instructions, document what you saw, and arrange an assessment that considers the entire room.
Professional escalation is particularly important when signs occur away from the mattress, when multiple sleeping areas are involved, or when repeated DIY cleaning has failed to stop new evidence. A landlord or managing agent should know promptly where the property is rented, because coordinated access and treatment decisions affect neighbouring rooms.
Simple Habits to Keep Your Mattress Protected Long Term
Protection works best as a quiet routine, not a response to every mark. Inspect the mattress perimeter, base, and headboard periodically, especially when changing bedding. The aim is to notice a change early while the room remains organised and easy to assess.
Keep storage under and beside the bed controlled. Clutter creates more seams, folds, boxes, and fabric surfaces to inspect, while a clear perimeter makes fresh spotting easier to identify. Don't place second-hand mattresses or upholstered furniture in the bedroom until you've examined them carefully and decided how they'll be handled.
Travel needs the same discipline. Keep luggage off the bed where practical, unpack clothing directly into laundry, and inspect suitcase seams before storing it. If you've stayed somewhere with a known issue, keep the luggage away from sleeping areas until it has been checked.
Use a sealed barrier sensibly
A breathable, waterproof mattress protector helps guard against spills and routine wear, but it isn't the same as a bed bug encasement. An encasement should fully surround the mattress, close securely, and remain undamaged. Check the zip line and corners during normal bedding changes, particularly after moving the bed or washing the cover.
Protect-A-Bed offers mattress protectors and bed bug encasements using its Miracle Membrane technology, with products intended to create a liquid-resistant or sealed protective barrier depending on the design. Its guidance on protecting a mattress from bed bugs is useful when you're deciding whether your current cover provides protection or merely covers the sleeping surface.
For broader mattress hygiene and lifespan advice, South Georgia mattress care provides a helpful maintenance reference. Combine those general care habits with a short bed bug check focused on seams, labels, corners, and the bed structure.
Recheck after any suspicious finding, after bringing used furniture home, or after travel that gives you a reason to be cautious. You don't need to live in a state of alarm. A clean bed area, careful laundry handling, and an intact protective cover give you a practical system for spotting problems without creating new ones.
Protect-A-Bed provides UK mattress protectors, pillow protectors, and bed bug encasements designed for residential and commercial bedding protection. Visit Protect-A-Bed to choose a suitable mattress barrier and make your inspection routine easier to maintain.